Grilled Flank Steak with Pepper Jack Cream Sauce

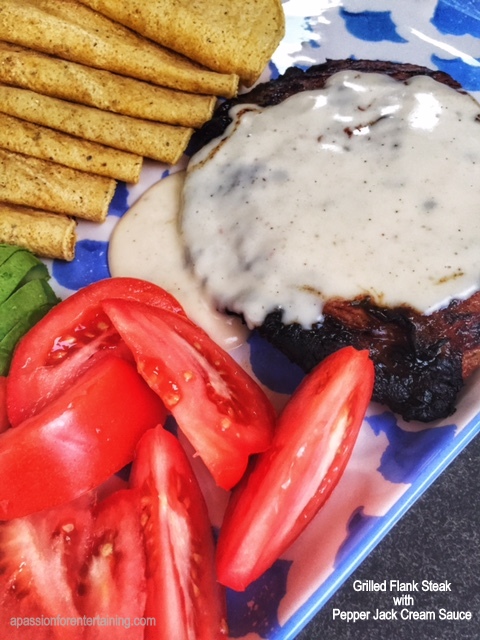
One of our favorite neighborhood Mexican restaurants serves a wonderful grilled steak with a cheese sauce along with a cheese enchilada  and beans.  It is so good, that we order it every time we go to that restaurant.  I had a flank steak in the freezer and decided I wanted to try my hand at this delicious entree.  I first combined lime juice, orange juice, garlic, diced jalapeno and a few other ingredients to marinate the steak.  I then made a basic cheese sauce and spiced it up with pepper jack cheese.  Served along side corn tortillas, tomato wedges, and avocados you will have a most spectacular presentation.   The cheese sauce is so good you will want to have plenty at the table to serve with the vegetables, tortillas and steak.  


Marinated Flank Steak

Ingredients

  • 2 limes, juiced
  • 2 cloves garlic, minced
  • 1/2 cup orange juice
  • 1/4 cup olive oil
  • 1/2 cup cilantro, minced
  • 1/2 teaspoon salt
  • 1/2 teaspoon pepper
  • 1 tablespoon white vinegar
  • 1 diced jalepeno, seeds removed

Instructions

  1. Combine all of the ingredients, pour over flank steak, refrigerate and marinate 2 - 24 hours.


Pepper Jack Cream Sauce

Ingredients

  • 2 tablespoons butter
  • 2 tablespoons flour
  • 1 1/4 cup milk
  • 1/2 teaspoon salt
  • fresh ground black pepper, to taste
  • 1/4 teaspoon garlic powder
  • 1/4 teaspoon cumin
  • 1/2 teaspoon chili seasoning
  • 4 ounces pepper jack cheese grated

Instructions

  1. In a medium saucepan over medium low heat, melt the butter.  Add the flour and stir until bubbly and all of the flour is incorporated.  Slowly stir in the milk.  Increase heat to medium-high and whisk constantly until bubbly and thick.  Add seasonings.  Continue stirring.  Remove from heat and add the cheese, stir until melted.  (If you made the sauce in advance and your steak is not finished on the grill, and your cheese sauce thickens - add a bit more milk to the cheese sauce and stir over low heat)

Pineapple Balls

I always like to reflect on my childhood and try to remember certain recipes that my mom would make for certain occasions.  I remember every spring and especially on Easter, she would always make something that included pineapple.  Pineapple salads, ham with a pineapple glaze, pineapple cakes, and fresh sliced pineapple is what I associate with spring.  These Pineapple Balls are just perfect when you want a small dessert after a wonderful meal.  They freeze beautifully so you can make them now and serve them over the spring holidays.


Pineapple Balls

Prep Time 15 minutes
Cook Time 10 minutes
Total Time 25 minutes

Ingredients

  • 1/2 cup granulated sugar
  • 1/2 cup unsalted butter, softened
  • 1/2 cup light brown sugar, packed
  • 1 egg, lightly beaten
  • 1 cup crushed pineapple, well drained
  • 1/2 cup chopped pecans, plus more for dusting, if desired
  • 2 cups flour
  • 1/2 teaspoon baking soda
  • 1/4 teaspoon salt
  • 1 teaspoon baking powder
  • 1 cup confectioners sugar
  • 1-2 tablespoons pineapple juice

Instructions

  1. Preheat oven to 375 degrees

    Cream the butter and sugars.  Add the egg, pineapple, and nuts.  Combine the dry ingredients, add to the pineapple mixture and mix well.

    Drop the dough by rounded teaspoonsful (or use a one tablespoon ice cream scoop) onto a parchment lined baking sheet.  Bake 9 - 11 minutes.  If desired, drizzle with glaze and dust with additional finely chopped pecans.  Yields 48 balls

  2. Sugar Glaze

    Mix 1 cup confectioners sugar and 1-2 tablespoons pineapple juice, drizzle over cookies.  Sprinkle with pecans, if desired.

Cinnamon Waffles – I wish I was still at The Homestead!

My husband and I spent last weekend at The Homestead in Hot Springs, VA.  We wanted a weekend getaway and decided to head to The Homestead after many great reviews from friends.  After a long and winding journey through the western part of Virginia, we drove into the small town of Hot Springs and was greeted by the massive resort on our left.  I must tell you, after driving many miles through the country roads, I thought I had put in the wrong address into our GPS, because I just could not believe there would much civilization, no less a resort in the mountainous remote area we were driving through.)  How wrong I was, the town of Hot Springs and The Homestead are beautiful.  As you know, I am always looking for great food and interesting finds, I had to go no further than their breakfast buffet on Saturday morning.  Before we headed out for a round of golf, we had the most delicious breakfast buffet in their main dining room.  So many delicious choices, I could hardly decide what to select.  It didn’t take me too long to find Roderick making Cinnamon Waffles, a specialty at The Homestead.  What a delicious breakfast treat, along with a vegetable omelet and grits, a breakfast of champions for these golfers!  So, back to reality today and back to my kitchen.  I decided to make my own Cinnamon Waffle recipe this morning, what a great way to remember a great trip.  

Our view from the 14th tee box on the Old Course at The Homestead.

Roderick making Cinnamon Waffles


Cinnamon Waffles

Ingredients

  • 2 eggs
  • 1 3/4 cups milk
  • 1/2 cup vegetable oil
  • 2 cups flour
  • 4 teaspoons baking powder
  • 1 tablespoon sugar
  • 1/2 teaspoon salt
  • 3 teaspoons ground cinnamon

Instructions

  1. Preheat waffle iron.  Beat eggs until fluffy.  Add remaining ingredients and beat just until smooth.  Pour batter into waffle iron and bake until steaming stops, approx. 4 1/2 - 5 minutes.  Remove carefully.  Makes 3 - 10 inch waffles.


White Truffle Popcorn

You cannot pass by this recipe.  The elegant taste of truffles tossed with popcorn is a taste sensation.  When I was playing around with ingredients one day, I brought out my bottle of white truffle oil and I had just made my Cantaloupe Tomato Salad and fresh Italian parsley was still on my cutting board.  I thought it was time for a glass of wine and I needed a break from recipe writing.  Out came a bag of microwave popcorn and I tossed in a few other items.   Time to sit, relax and enjoy the fruits of my labor.

5 from 1 vote
Print

White Truffle Popcorn

Ingredients

  • 1 bag microwave popcorn, plain
  • 1 tablespoon unsalted butter, melted
  • 1 tablespoon white truffle oil
  • 1/3 cup parmigiano reggiano cheese finely grated
  • 2 tablespoons fresh Italian parsley minced
  • kosher salt,

Instructions

  1. Pop corn as directed on package.  Pour popped corn into a large bowl.  Toss with white truffle oil, add melted butter, toss.  Add cheese and parsley, toss.  Salt to taste.  Enjoy!

Cantaloupe Tomato Salad with Herb Dressing

I am always striving to create unusual salads and this is one combination you might not think about putting together.  The sweet cantaloupe combined with vine-ripened tomatoes and a hit of red onion, topped with a citrus honey herb dressing is the perfect salad to serve along side grilled chicken, fish or shellfish.   A crumble topping of feta sets this salad apart from all others.  A feast for the eyes and your taste buds!

Cantaloupe Tomato Salad with Herb Citrus Dressing

Servings 8

Ingredients

  • 1 cantaloupe
  • 4 large tomatoes
  • 1/4 red onion, diced
  • 1 lemon, juiced
  • 3 tablespoons cider vinegar
  • 2 tablespoons honey
  • 1/3 cup Italian parsley, minced
  • 2 tablespoons fresh basil, minced
  • 1 teaspoon kosher salt
  • 1/2 teaspoon fresh ground black pepper
  • 1 teaspoon Dijon mustard
  • 2 teaspoons fresh mint, minced
  • 1/2 cup extra virgin olive oil
  • 1/2 cup crumbled Feta cheese

Instructions

  1. Cut cantaloupe, remove seeds, cut away rind and slice into thin slices.  Dice onion, and thinly slice tomatoes.  Layer in a salad bowl.  Combine dressing ingredients; lemon juice, cider vinegar, parsley, basil, salt, pepper, mustard, and mint in a container that you can seal and shake.  Add the olive oil and vigorously shake until well combined.  Pour over cantaloupe mixture, refrigerate for one hour.  Top with crumbled Feta, serve.


Caramelized Onion Soup

Who doesn’t love a delicious bowl of onion soup topped with a cheese crouton?  I was curious where this soup originated from – I assumed France since it is typically called French Onion Soup.  To Wikipedia I went and here is what I found:

Onion soups have been popular at least as far back as Roman times. Throughout history, they were seen as food for poor people, as onions were plentiful and easy to grow. The modern version of this soup originates in Paris, France in the 18th century, made from beef broth, and caramelized onions. It is often finished by being placed under a grill in a ramekin with croutons and cheese melted on top. The crouton on top is reminiscent of ancient soups.

This soup requires time, so definitely not a thirty minute meal.  Slowly caramelizing the onions is the key to this delicious soup; that is the reason I titled my soup Caramelized Onion Soup. 

A delicious treat on a cool spring evening.

Caramelized Onion Soup

Servings 4

Ingredients

  • 3 sweet yellow onions, sliced thin
  • 2 tablespoons butter
  • 1 teaspoon sugar
  • 2 quarts beef broth
  • 2 teaspoons fresh thyme minced
  • 1 teaspoon salt and pepper or to taste
  • 1/4 cup sherry
  • 1/2 baguette sliced in 1/2 inch slices
  • 8-10 ounces gruyere cheese grated

Instructions

  1. In a large dutch oven, melt butter, add sliced onions, sugar and salt.  Cook for approximately one hour over medium low heat, stirring frequently until onions are caramelized and dark brown.  Add stock, thyme, sherry, salt and pepper.  Simmer on low for 45 additional minutes.  

    Preheat broiler.  On a foil lined baking sheet place baguette slices and top with grated cheese.  When ready to serve the soup, broil bread sliced until cheese is melted and edges begin to brown, watch carefully. 

    Ladle soup into bowls and top with toasted bread slices, serve.


Interesting Find – Farmer’s Daughter Jams and Preserves and Whole Wheat Biscuit Recipe

I am always on the search for interesting food items to incorporate into my cooking and my blog.  When I saw Farmer’s Daughter Jams and Preserves this past weekend, I just have to buy a few jars.  The cute jars and catchy batch names such as Blackberry Julep Jam and Strawberry Honeysuckle Preserves were calling my name.  I spend of bit of time researching the company and found they are headquartered in Hillsborough, NC.  After checking their website (http://www.farmersdaughterbrand.com/index.htm) I found the following information that tells their story:

Farmer’s Daughter is a farm-driven artisan food business celebrating the flavors of the South and the soils of the North Carolina Piedmont while gaining inspiration from authentic food cultures worldwide.  It was founded in 2007 by April McGreger, who learned the art of preserving at the elbows of her mother and grandmother amidst a rural farming community in Mississippi.  Farmer’s Daughter seeks to promote the value of sustainable, small-scale agriculture as well as traditional, handmade methods of preserving.

I am always impressed with those that continue the traditions set by their mothers and grandmothers.  We tried both of the above varieties, they are wonderful and especially delicious on my whole wheat biscuits- YUM!

These biscuits are incredibly easy to prepare and the results are always great.  I rolled my dough approximately 3/4 inch thick, if you want event taller biscuits, you can roll the dough up to 1 inch thick.  You will have fewer biscuits, but very impressive when over the top in height!


Whole Wheat Biscuits

Servings 12

Ingredients

  • 2 cups flour
  • 1 cup whole wheat flour
  • 4 1/2 teaspoons baking powder
  • 2 tablespoons sugar
  • 1/4 teaspoon salt
  • 3/4 teaspoon cream of tartar
  • 3/4 cup unsalted butter softened and diced
  • 1 egg lightly beaten
  • 1 cup milk

Instructions

  1. Preheat oven to 450 degrees.

    In a large mixing bowl. combine the flours, baking powder, sugar, salt and cream of tartar.  Add butter and using a pastry blender, cut butter into mixture until the butter is the size of small peas.  Make a well in the center, add egg and milk and combine with a fork until all of the dry ingredients are moist.  Turn dough onto a well floured surface and knead until all is smooth and all dry ingredients are incorporated.  Roll dough to 3/4 inch thick, cut with three inch cutter.  Place biscuits on parchment lined baking sheet, 1/4 inch apart.  Bake 12 minutes or until golden brown.   


Sugar Crusted Lemon Blueberry Muffins

Did you know that blueberries are one of the few fruits native to America?  Our early settlers in Plymouth, MA were exposed to blueberries by the Native Americans and now they are grown in many regions of the US and Canada.  Springtime always seems to bring the blueberries, strawberries and raspberries to center stage in any produce department.  I couldn’t pass by the blueberries, perfect for my Sugar Crusted Lemon Blueberry Muffins.  I top these with coarse grain sugar for that extra crunch.  

One more note, you can make these the night before and bake in the morning – what a wonderful way to start the day!

Sugar Crusted Lemon Blueberry Muffins

Ingredients

  • 1 3/4 cups flour
  • 1 cup sugar, divided
  • 2 1/2 teaspoons baking powder
  • 3/4 teaspoon salt
  • 1 egg, well beaten
  • 1/3 cup vegetable oil
  • 3/4 cup milk
  • 1 cup blueberries, washed and drained
  • 2 teaspoons lemon rind, grated
  • 2 tablespoons butter, melted
  • 1/4 teaspoon lemon juice

Instructions

  1. Preheat oven to 400 degrees.  In a large bowl, mix the flour with 1/2 cup sugar, the baking powder, and salt.  Make a well in the center.  Combine the egg, oil, and milk.  Add to the dry ingredients, stir until moistened.  Toss the blueberries with 2 tablespoons of sugar and the lemon rind.  Fold into the batter.  Fill muffin pans lined or greased 2/3 full.  Bake for 20 minutes or until golden brown.

    While the muffins are cooking, melt the butter and stir in the lemon juice.  Dip the warm muffin tops in the butter and sprinkle with sugar.  You can use coarse sugar or granulated sugar for the tops.

    Make ahead - you can prepare the batter and fill the muffin cups, cover with plastic wrap and refrigerate.  Just bake, dip and serve.


Italian Rolls

One of our favorite local Italian restaurants serves the most delicious rolls, always hot out of the oven and served with an olive oil dipping sauce.  The last time we were there I was convinced I was going to try to duplicate those rolls.  I think this recipe is as close as I can get.  Since I make yeast breads frequently, I tweaked one of my existing recipes. .  Not a fan of making yeast breads?  Try this one – 4 ingredients in this recipe and your bread skills will go from zero to hero!  Give them a try – you will not be disappointed.  Next time I make these, grilled Italian sausages and peppers are going along with these rolls!  


Italian Rolls

Ingredients

  • 1 package active dry yeast
  • 1 1 /4 cups warm water
  • 3 3/4 cups unbleached flour
  • 2 teaspoons kosher salt
  • olive oil for brushing on top of rolls

Instructions

  1. If using a food processor - stir the yeast into the water and let stand for 10 minutes.  Put flour and salt in processor bowl, turn processor on and slowly add the water, if the dough is too dry, add a bit more water until it forms a ball.  Let processor knead the dough for approx. 4 minutes. 

    If using a mixer - repeat the steps above using the paddle attachment, once incorporated use the dough hook and knead for approx. 4 minutes

    If by hand - stir the yeast into the water and let stand for 10 minutes in a large bowl.  Stir in flour, one cup at a time - add the salt.  Using your hands; incorporate all of the flour, turn out on to a floured surface and knead until smooth and elastic - 8 - 10 minutes.

    Place dough in a greased bowl, let rise until double, approx. 1 hour.  Turn dough onto a floured board, divide dough into 10 equal portions, make each roll into a ball. Brush each dough ball with olive oil.  Cover the dough balls and let rest for 10 minutes.  Flour a baking sheet.  Make a deep indentation with the side of your hand in each roll down the middle, place the roll indentation side down on floured baking sheet, repeat with all of the rolls.  Cover rolls and let rise for another hour.  Preheat oven to 425 degrees. Oil another baking sheet, after they have risen, place rolls indentation side up on this sheet,   Bake rolls for 15 - 18 minutes or until golden brown.  To make a crisp crust, spray water three times into the oven during the first 10 minutes of baking.


Butterflied Grilled Shrimp

When you grill shrimp, leaving the shell on keeps the flavor of the shrimp and does not dry it out.  I purchased large shell-on shrimp, cut the shell, deveined and butterflied the shrimp. Then I quickly marinated them in a white wine sauce, grilled them over medium high heat  and served them with cocktail sauce and butter for dipping.  I also grilled two lemon halves and after everything came off the grill, squeezed the lemon over the shrimp.  What a finger lickin’ good recipe this is – easy to prepare and a perfect spring dinner.  

I am trying a new recipe format – tell me what you think…
Looking for any particular recipes?  I am always looking for new ideas

Butterflied Grilled Shrimp

Prep Time 15 minutes
Cook Time 10 minutes
Total Time 25 minutes
Servings 4

Ingredients

  • 1 pound shrimp, shell-on
  • 1/4 cup white wine
  • 2 tablespoons chopped Italian parsley
  • 1/4 cup olive oil
  • 1/2 lemon squeezed
  • 1 lemon cut in half
  • 1/8-1/4 teaspoon dried red pepper flakes
  • salt and pepper

Instructions

  1. Cut the shell of the shrimp, carefully de-vein and butterfly shrimp; using a paring knife make an incision from the tail to the opposite end. Do not cut all of the way through. Place in a large baking dish. Combine white wine, red pepper, parsley, olive oil  juice of 1/2 lemon,and salt and pepper. Drizzle over shrimp. Let stand for 15 - 20 minutes. Heat grill to medium high heat. Place shrimp on the grill, cook 4 minutes and flip to other side for approx. 3 minutes until shrimp is opaque. Grill the lemon halves. Remove shrimp to a platter with the grilled lemon halves. Squeeze grilled lemon over shrimp prior to serving. Serve with melted butter or your favorite cocktail sauce.