Corn, Goat Cheese and Tomato Salad

What do you do when you have fresh corn, tomatoes, basil, and goat cheese?  Here is quick answer – Corn, Goat Cheese and Tomato Salad.  Super easy to make and one of those delicious side dishes that you are amazed is so easy to make.  I cut the corn of the cobs, diced the tomatoes and shortly after I had a fantastic salad.

Corn, Goat Cheese and Tomato Salad

Servings 4

Ingredients

  • 2 ears fresh corn, kernels cut off
  • 2-3 tablespoons olive oil
  • 1 small onion, minced
  • 2 large tomatoes, diced
  • 2 tablespoons fresh basil leaves, minced
  • 1 tablespoon champagne vinegar
  • salt and pepper, to taste
  • 1/2 cup goat cheese, crumbled

Instructions

  1. Heat oil in a medium skillet over medium high heat.  Add onion and cook for 4 - 5 minutes or until transparent. Add corn and stir until tender, approximately six minutes.  Spoon mixture into a serving bowl.  Toss with vinegar, salt and pepper.  Top with goat cheese.  Serve warm

Devil’s Food Cake

Every once in awhile, I bake a cake.  I must admit vary rarely, however, always for birthdays and then it is usually a carrot cake.  So, baking a Devil’s Food Cake is a real treat.   I never use cake mixes, I guess I am a purist and I always want to know what is in the food we eat.  Additives and preservatives – I avoid at all costs.  I know sometimes I cannot avoid then, but when I have the choice, I prefer to bake from scratch.  I know this a holdover from my mom and happy to say I can continue her traditions.   This cake is just divine and easy to prepare.  I topped mine with Seven Minute Fluffy Frosting and it is excellent.  


Devil's Food Cake

Servings 12

Ingredients

  • 2 1/2 cups flour
  • 1/2 cup unsweetened cocoa powder
  • 1 1/2 teaspoon baking soda
  • 1 teaspoon salt
  • 1 cup sugar
  • 1/2 cup shortening
  • 1 teaspoon vanilla extract
  • 3 eggs divided, separate yolks and whites
  • 1 1/2 cup cold water
  • 3/4 cup sugar

Instructions

  1. Preheat oven to 350 degrees. Grease and flour two nine inch cake pans.  In a medium bowl sift together the flour, cocoa powder, baking soda and salt, set aside.  In a large mixing bowl, beat shortening on medium speed for 30 seconds.  Add the 1 cup sugar and vanilla and beat until fluffly.  Add the egg yolks, one at a time and beat well after each addition.  Add dry ingredients and water alternately, ending with the dry ingredients.  Mix until all dry ingredients are incorporated.  In a separate bowl, beat the egg whites until soft peaks form.  Slowly add the remaining 3/4 cup sugar, beat until stiff peaks form.  With a spatula, fold the egg whites into the cake batter.  Divide the batter between the two prepared cake pans.  Bake for 30 - 35 minutes or until a tester comes out clean.  Cool cakes for 10 minutes prior to removing from pans.  Cool completely, frost.


7 Minute Fluffy Frosting

Ingredients

  • 2 cups sugar
  • 1/2 teaspoon salt
  • 1 teaspoon cream of tartar
  • 4 egg whites
  • 6 tablespoons water
  • 2 teaspoons vanilla extract

Instructions

  1. For this recipe you will want to use your electric hand mixer. 

    In a stainless heavy bottom saucepan combine all ingredients except the vanilla extract.  Place pan on burner over medium low heat.  Beat with electric hand mixer on high speed for 7 minutes, while the burner is on.  Remove the pan from the burner, mix in the vanilla.  The frosting should be light, fluffy and stiff peaks form.  Frost middle and sides of cake.  For decorative chocolate drizzle, melt 1/2 teaspoon shortening and 1  1-oz. block of unsweetened chocolate, drizzle over sides of cake.

Interesting Find – Georgia Sourdough Co.

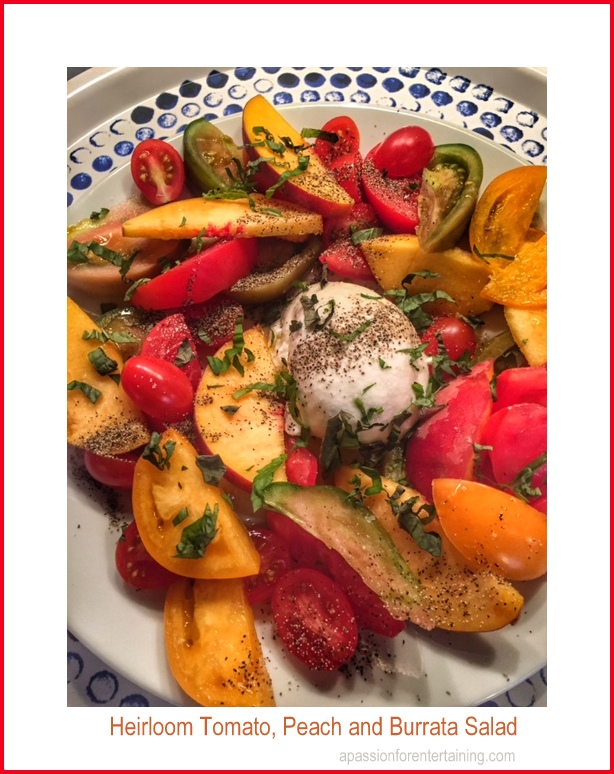
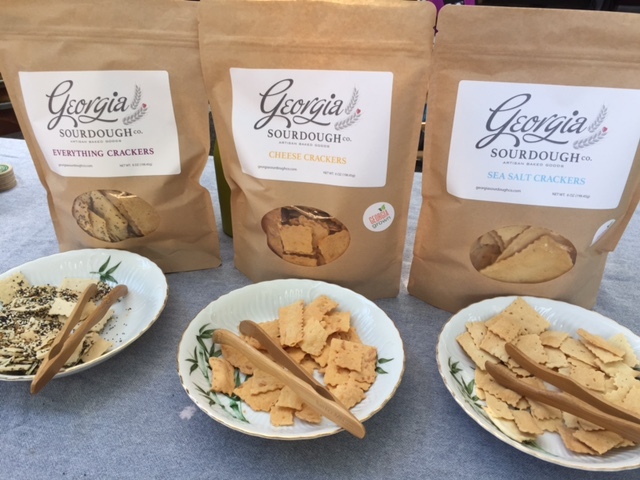
Those of you that follow my blog regularly know that I bake almost everything from scratch,  However, even I love to find great small batch companies that have mastered certain products.  When I came across the crackers from the Georgia Sourdough Co,  I knew I wanted to share these as an Interesting Find.  Each batch is hand rolled and cut from sourdough, baked and packaged.  I have tried the Sea Salt and Cheese crackers and both are terrific.  

When I inquired about the product, Tracy Gribbon sent me a quick note about how she got started in the business.  Below is a bit of our conversation.  As many have said before, you just never know what happens when you follow your passion – read below about how she got started in the cracker business.

I lived in NYC for 8 years and was a beverage director. So I filled my days tasting wines and writing lists. And due to a healthy R&D budget, my city and my tiny kitchen apartment- I spent most evenings out to dinner. I decided to move back to Atlanta in 2013 and moved into a house- it was 4x the size of my apartment for 1/2 the price. And it has an actual size kitchen. I took a few months to settle in and not work and I found myself baking a lot. On some prodding from my uncle- I made a sourdough starter. Just the old flour and water on the counter until it populated. I was convinced that I would bake my own fresh bread and life would be glorious! Only hiccup to that is it took me 18 months to successfully make a loaf of bread that was not a brick. So during that time I was experimenting with all sorts of sourdough things. I made chocolate chip cookies, coffee cake, pizza dough, biscuits, pie crust, etc. And I was making the Sea Salt crackers repeatedly. And i would just give them away to friends and family. 

I worked at a couple different restaurants for friends. But the jobs were different down here. And most required that I work at night and managing the floor- which I was not a fan of. I was part of a CSA with Greg Hutchins of Heritage Farms- and he had a little online marketplace where he sold his products and other local vendors. I brought him some crackers one day to see if he thought they could sell. His response was “watch out Nabisco! These are fabulous”. And so it began. And once we started the farmer’s markets stores started approaching us to sell the crackers in their stores. And we keep growing and we keep learning more and more about the healthful effects of sourdough. It’s so cool and I feel #blessed to be on this path. Life is pretty cool!

 What a fantastic story and I will tell you fantastic crackers, check out her website –  http://www.georgiasourdoughco.com/

And remember…..always follow your passion, you just never know what will happen!  

(When I followed my passion and started writing this blog for family and friends, I never thought in a million years that my blog would become a nationally recognized food blog and featured in Southern Living as one of their 2017 Favorite Food Blogs)


Broccoli with Spicy Orange Sauce

I am always looking for new and different ways to prepare vegetables, especially since we are in peak season.  I think I have cooked broccoli every way imaginable.  Broccoli with Spicy Orange Sauce is one of our favorites.  Crisp broccoli with a zesty sauce and the crunch of peanuts – perfect to serve with grilled meats or fish.  Yum!


Broccoli with Spicy Orange Sauce

Ingredients

  • 2 pounds fresh broccoli
  • 1/2 cup orange juice
  • 2 teaspoons honey
  • 1 treaspoon Dijon mustard
  • 2 teaspoon grated orange rind
  • 1 teaspoon soy sauce
  • 1 clove garlic, minced
  • 1/8 teaspoon red pepper flakes
  • 1 tablespoon water
  • 1 1/2 teaspoons cornstarch
  • 1 tablespoon chopped peanuts
  • 1 teaspoon unsalted butter

Instructions

  1. Slice and steam broccoli until crisp but tender, approximately six minutes.  While the broccoli is cooking, in a medium saucepan combine the orange juice, honey, mustard, orange rind, soy sauce, garlic and red pepper flakes.  Bring to a boil over medium heat, boil for one minute, stir occasionally.  Combine the cornstarch and water, add to the orange juice mixture.  Cook for one minute or until thickened.  Remove from heat and stir in butter.  Drain broccoli, place in a bowl and pour sauce over.  Toss until well combined.  Place on a serving dish and sprinkle with chopped peanuts.

Cinnamon Flat Tire Rolls

Well, not exactly flat tires, but cinnamon rolls that look like the air has been let out!  My mom was an avid bread baker and she always was trying something new.  This is one of her recipes, that I think is a real winner.  For seasoned bread bakers, these are a cinch to make.  For those of you new to bread baking, this is a sure-fire recipe to try.  The dough is easy to make and a great beginner recipe. I had an afternoon free and decided these were just the thing to make.  I think you will agree, they are well worth your time and your kitchen will smell divine.  They are crisp and delicious, where is my cup of coffee?


Cinnamon Flat Tire Rolls

Ingredients

  • 3 1/2 - 4 cups flour
  • 1 package active dry yeast
  • 1 1/4 cups milk
  • 1/4 cup granulated sugar
  • 1/4 cup butter
  • 1 teaspoon salt
  • 1 egg
  • 1/2 cup granulated sugar
  • 1/2 cup packed brown sugar
  • 1/2 cup butter, melted
  • 1/2 teaspoon ground cinnamon
  • 1/4 cup melted butter
  • 1 cup sugar
  • 1/2 cup chopped pecans
  • 1 teaspoon ground cinnamon

Instructions

  1. In a large mixing bowl combine 2 cups of flour and the yeast.  Heat milk, 1/4 cup sugar, and salt in microwave for 80 seconds.  With the dough hook on your mixer, slowly add the milk mixture.  Beat at low speed for 1 - 2 minutes until all of the flour is incorporated.  Add the egg.  Add remaining flour until the dough does not cling to the sides of the bowl.  Mix on medium speed for 3 minutes. Place dough in a greased bowl, turn over once to grease surface.  Cover, let rise in a warm place until double in size (1 - 1 1/2 hours).

    Punch dough down and cut in half.  Cover and let rest for 10 minutes.  Flour the surface you will be rolling the dough on, roll the first half to a 12 x 12 inch square. Combine 1/2 cup melted butter with 1/2 cup sugar, 1/2 cup brown sugar and 1/2 teaspoon ground cinnamon.  Spread one-half of the sugar mixture over the rolled dough.  Roll dough jelly roll style, pinch edges, cut into 12 slices and place on parchment lined cookie sheets (I used 3 cookie sheets).  Repeat with the other half of dough.  Flatten rolls to about 3 inches in diameter.  Cover and let rise until double in size approx. 30 minutes.

    Combine the remaining 1 cup sugar, pecans and 1 teaspoon cinnamon, set aside. Melt remaining 1/4 cup butter.  Cover rolls with a piece of parchment or waxed paper.  Use a rolling pin to flatten the rolls 1/4 inch thickness; remove paper. Brush rolls with melted butter and sprinkle with sugar mixture.  Cover again with paper and roll rolls flat.  Bake 400 degrees for 10 - 12 minutes.

Crispy Oatmeal

Looking for a new way to prepare oatmeal?  Why not make it the night before and then brown in the skillet in the morning.  You will have Crispy Oatmeal slices perfect to serve with maple syrup.  Just make the oatmeal the night before, pour into a loaf pan and chill.  Then in the morning all you have to do is slice and cook.  The outside is crispy and the inside is delicious creamy oatmeal.  You could also add cinnamon or any other of your favorite mix-ins prior to chilling.  I think you will really like this new way to cook oatmeal – I know we do. 

Crispy Oatmeal

Ingredients

  • 2 cups quick-cooking oatmeal
  • 1 1/4 teaspoon salt
  • 3 cups boiling water
  • butter
  • maple syrup

Instructions

  1. In a medium saucepan bring water to a boil.  Stir in oatmeal and salt.  Cook 1 minutes, stirring occasionally.  Remove from heat and cover for 5 minutes.  Spray a small loaf pan with cooking spray, line with plastic wrap and spray plastic wrap,  Spoon oatmeal into prepared pan.  Let cool. Refrigerate overnight.  In the morning, pull the oatmeal out of the pan and slice into 1/2 inch thick slices.  In a skillet brown the slices in butter over medium heat until each side is golden brown, turn once.  Serve with syrup, dust with powdered sugar, if desired.  

Grilled Artichokes with Piri Piri Dipping Sauce

I have been traveling quite a bit this summer and have found on two different occasions, Grilled Artichokes on restaurant menus. Well, artichokes are one of our favorites so I decided when I got home, that I too would be making Grilled Artichokes.  I got the idea for the Piri Piri dipping sauce after having a dipping sauce featuring Piri Piri this summer.  

Exactly what is Piri Piri you ask?  Thanks to the internet and Wikipedia I found the origin of Piri Piri:

Piri piri sauce (used as a seasoning or marinade) is Portuguese in origin and “especially prevalent in Angola, Namibia, Mozambique and South Africa”. It is made from crushed chillies, citrus peel, onion, pepper, salt, lemon juice, bay leaves, paprika, pimiento, basil, oregano, and tarragon.

These are a must try for all artichoke lovers, I boiled the artichokes and then grilled them for that smokey grilled flavor.  What a treat!


Grilled Artichokes with Piri Piri Dipping Sauce

Ingredients

  • 2 artichokes
  • 1 lemon, squeezed, rinds reserved
  • 1/3 cup mayonnaise
  • 1/2 cup sour cream
  • 1/4-1/2 teaspoon piri piri sauce
  • 1 teaspoon lemon juice
  • 1 tablespoons fresh chives, minced
  • salt and pepper, to taste

Instructions

  1. Select a kettle or pot large enough to hold all the artichokes you are cooking. Half fill it with water and set it over high heat to boil. Meanwhile, trim the artichokes.

    Rinse the artichokes, cut 1/4 inch of the bottom stem off.  Rub the cut areas with lemon. Slice off the top inch of each artichoke and rub the cut area with lemon. Using kitchen shears snip off the top half inch of each leaf.   Cut each artichoke in half lengthwise and scrape out the fuzzy choke with a teaspoon.  Place the artichokes and lemon rinds in the boiling water, lower heat to simmer and cook for 15 minutes.  Remove artichokes from the water and drain.

    Heat grill to medium-high heat.  Then grill the artichokes for 10 - 15 minutes. Turn frequently.  Remove from the grill and serve with Piri Piri Dipping Sauce.


    Piri Piri Dipping Sauce

    Combine piri piri sauce, lemon juice, chives, mayonnaise and sour cream.  Stir well to combine.  Season with salt and pepper.  Serve with grilled artichokes.


Southern Crab Nachos

You might wonder why I call these Southern Crab Nachos.  Well, it is because I added a layer of cheese grits!  I met Parker Hinson  from Old School Mill in Albemarle, NC. and he graciously gave me a bag of their stone ground grits.  After living in Texas for five years and making grits frequently, I can absolutely say these are the best grits I have ever had. I wanted to add a southern twist to my nachos and decided to add a layer of cheese grits.  The best thing about these nachos is not only does the top of the Southern Crab Nachos ooze with deliciousness of cheese and crab, the bottom chips scoop up a wonderful layer of cheese grits with the other toppings.  Each bite is so delicious you will want to make extras!

These grits are a find!  Check out their website http://oldschool.com  Here is a little bit on info on their mill:

Old School Brand uses the art of stone grinding grains into wonderfully pure meals, flours, and grits. Since those first products were made we have developed a line of foods and mixes that bring back all the rich goodness and flavor of centuries ago.


Southern Crab Nachos

Ingredients

  • 1 recipe Cheese Grits
  • 1 recipe Black Bean Relish
  • 8 - 12 ounces jumbo lump crab meat
  • 1 large bag tortilla chips (flour or corn)
  • 1 cup grated monterey jack cheese
  • 1 cup shredded sharp cheddar cheese
  • 1 recipe Avocado Lime Buttermilk Dressing

Instructions

  1. Preheat oven to 375 degrees. Prepare grits and spoon over the bottom of your ovenproof serving dish. Top with layers of tortilla chips.  Spoon over the black bean relish, crab meat and cheeses.  Bake until hot and bubbly, 8 - 12 minutes.  Serve with a side of avocado lime buttermilk dressing.


Cheese Grits

Ingredients

  • 2 cups water
  • 1/2 cup stone ground grits
  • 1 teaspoon salt
  • 1/3 cup shredded cheddar cheese

Instructions

  1. Bring water and salt to a boil.  Add grits.  Reduce heat to simmer and cook stirring occasionally for 20 minutes.  Remove from heat and stir in the cheese. 


Black Bean Relish

Ingredients

  • 1/2 cup frozen corn, thawed
  • 1/3 cup black beans, rinsed and drained
  • 1 tablespoon red onion, minced
  • 2 teaspoons jalapeno pepper, minced
  • 1/4 cup tomato, finely diced
  • 2 tablespoons red pepper, minced
  • 2 tablespoons cilantro, minced
  • 1/2 lime, squeezed
  • salt and pepper

Instructions

  1. Combine all ingredients.


Avocado Lime Buttermilk Dressing

Ingredients

  • 1 ripe avocado
  • 3/4 cup buttermilk
  • 3 tablespoons sour cream
  • 2 tablespoons mayonnaise
  • 1 tablespoon cilantro, minced
  • 1 teaspoon grated lime peel
  • 1 teaspoon lime juice
  • 4 dashes Tabasco sauce
  • salt and pepper

Instructions

  1. Cut avocado in half and discard pit, scoop flesh into food processor bowl. Combine all remaining ingredients in the bowl of your food processor and process until smooth.  Refrigerate until ready to serve

Heirloom Tomato, Peach and Burrata Salad

We recently had lunch at a wonderful new French restaurant in Georgetown in Washington, DC.  On the menu they had an heirloom tomato salad with burrata.  If you not not familiar with burrata cheese, it is a fresh Italian cheese made from mozzarella and cream. The outer shell is solid mozzarella, while the inside has a velvety creamy texture .  Therefore, when you cut into the cheese, the inside oozes out and is absolutely delicious.  We enjoyed the salad so much I said this is something I will definitely make. Fast forward a few weeks and we are visiting Georgia during peak peach season.   My daughter came up the great idea of adding peaches to this recipe – Heirloom Tomato, Peach and Burrata Salad.  This combination is unique and absolutely delicious, not to mention the beautiful presentation.  I served this with grilled lamb chops and roasted potatoes, a wonderful summer menu.

Heirloom Tomato, Peach and Burrata Salad

Ingredients

  • 4 Heirloom tomatoes, varied colors
  • 1 large ripe peach
  • 1 ball Burrata cheese
  • fresh basil, minced
  • extra virgin olive oil
  • salt and pepper

Instructions

  1. Thinly slice the tomatoes and peach.  Spread on serving dish.  Place cheese in the center.  Drizzle with olive oil, top with basil, salt and pepper.  Serve at room temperature.

Sweet Potato Treats for your favorite dog(s)!

I received this recipe from my neighbor who has a darling labradoodle.  These are one of her dog’s favorite treats.  Now that we have a goldendoodle in our family, I decided to bake some for my daughter’s dog.  The picture below says it all – they were a hit!  If you have any furry friends – I recommend trying these.  I adjusted the original recipe a bit and left the treats in the oven to cool so they were extra crispy.  I used a small cookie cutter, bite size for this puppy!

Sweet Potato Treats for Furry Friends

Ingredients

  • 1 sweet potato
  • 2 1/2 cups whole wheat flour
  • 1/4 cup unsweetened applesauce
  • 2 eggs

Instructions

  1. Preheat oven to 350 degrees.  Prick sweet potato and microwave for 6 minutes on high.  Cool and then slice in half and scoop out flesh, you will need abour 1 cup of sweet potato.  In a mixing bowl combine the sweet potato, whole wheat flour, applesauce and eggs.  Combine with a wooden spoon until all ingredients are well mixed.   Turn dough out onto floured board.  Roll dough to approximately  1/3-1/2 inch thick.  Cut with cookie cutters (or you could slice into small squares).  Place treats on a parchment lined cookie sheet.  Bake for 40 minutes, turn over after 25 minutes.  Turn off oven and do not open the oven door.  Let the treats cool completely in the oven. 

    If you rolled the treats a bit thicker and want these treats extra crispy with a hard crunch, double bake.  Keep the treats in the oven and set the temp to 200 degrees.  Bake an additional 10 minutes, then turn off the oven again and let them cool in the oven for a second time.